How do you use on camera flash without the on camera flash look?
Bounce is the whole trick: what the ceiling does to a small hard source, exactly why nobody can tell you the power loss in advance, and the sixty second test that answers it in your room.
KEY TAKEAWAYS
- Direct flash looks like direct flash because the source is tiny and sits on the lens axis. Fix either one and the look improves; bounce fixes both at once.
- Aim the flash head up and behind you at a white ceiling and the ceiling becomes the light. Modern flash heads rotate far enough to bounce in almost any direction: one current unit specifies 0 to 330 degrees horizontally and up to 120 degrees vertically.
- Nobody can tell you how much power bounce costs in advance, and this chapter shows why the calculation genuinely cannot be done. The honest answer is a sixty second test in the room you are standing in.
- As a rule of thumb to seed that test: expect on the order of two to three stops under a normal white ceiling, then trust your own frame, not the rule.
Why direct flash looks like that
The on camera flash look is two separate problems wearing one trench coat. The first is size: a bare speedlight tube is a few inches across, and a source that small throws shadows with razor edges. The second is position: mounted on the hotshoe, the light travels out along the lens axis, so every shadow falls directly behind the subject where the camera cannot see it. Faces go flat, backgrounds go dark, and skin shines, because the light is returning straight back into the lens.
Every fix for on camera flash attacks one of those two facts. Diffusion domes and bounce cards make the source slightly bigger. Bounce makes it enormously bigger and moves it off axis at the same time, which is why bounce is the technique that actually changes the picture and the rest are trims.
Bounce: borrowing a bigger source
Tilt the flash head up and slightly behind you, fire, and the ceiling above and behind your head becomes the effective source: yards across, off axis, and soft. The mechanics are covered scenario by scenario in the reception settings chapter; this chapter is about what bounce is and when the room refuses it.
The hardware is rarely the limit. Flash makers publish the swing range: the Godox V1Pro spec table gives its bounce head 0 to 330 degrees horizontally and minus 7 to 120 degrees vertically.1 That is enough travel to bounce off the ceiling, either wall, or the wall behind you. Behind you is the most flattering and the most forgotten: the light comes back over your shoulder at head height, like a window you carried in.
What the room must supply is a surface that is close, matte, and near white. Height matters because the light must travel up and come back. Color matters twice: a colored surface eats power and tints everyone in the frame, and no exposure correction fixes a color cast baked into the light itself. A dark timber ceiling fails on both counts at once, which is why the reception chapter tells you to look up before anything else.
The number nobody can give you
Here is the question every beginner asks: bounce costs power, so how many stops do I add? The honest answer is that the number cannot be computed in advance, and it is worth thirty seconds to see why, because the why is what saves you from confident nonsense on the internet.
The standard photographic reference states the effect plainly: bounce and diffusion severely reduce the illumination on the subject, and it declines to put a general number on it, noting the result depends on the nature and color of the reflecting surface.2 Unpack that refusal and four unknowns fall out. First, the ceiling’s reflectance: nowhere published, nowhere marked, and it scales the whole answer. Second, the true light path: flash to ceiling to subject, a folded distance you cannot pace out. Third, the surface’s color, which shifts white balance in a way no aperture change corrects. Fourth, and deepest: once the ceiling is lit, it is the source, and a ceiling is a huge diffuse panel, not a point. The inverse square arithmetic that works for a bare flash is stated for point sources only,2 so the familiar math is wrong in form here, not just short of inputs.
So we will not print a fake number, and you should distrust anyone who does. What we can give you is the test, and it is fast:
- Set the flash to manual, about 1/8 power, head at about 60 degrees up and behind. Take one frame of a person, or a chair standing in for one.
- Read the histogram. Too dark: double the power. Too bright: halve it. One or two frames of that converges, because each step is a full stop.
- Note the power level that worked and the ceiling that produced it. That pairing is your number for this room, and it is worth more than any table, because you measured it where it is true.
- When you change rooms, run it again. Sixty seconds, and it embarrasses every rule of thumb, including ours.
If you want a seed value for step one under a normal height white ceiling, expect somewhere in the two to three stop range over direct flash, and treat that as a starting guess to be corrected by your own test, never as a spec. Under a high, dark, or colored ceiling, stop negotiating with physics: switch to the direct flash mitigations in the table below, or take the light off the camera entirely, which is the next chapter.
Starting points
| SCENARIO | ISO | SHUTTER | APERTURE | FLASH | CHANGE THIS FIRST |
|---|---|---|---|---|---|
| White ceiling ~10 ft, bounce 60° up behind | 1600 | 1/160 | f/2.8 | 1/8 | Flash power, full stops to converge |
| Wall behind you, near white, ~8 ft | 1600 | 1/160 | f/2.8 | 1/8 | Swivel angle, keep it off axis |
| No bounce surface, dome diffuser on | 800 | 1/160 | f/4 | 1/16 | Distance, the dome buys little |
| No bounce, direct, dragged shutter | 1600 | 1/60 | f/2.8 | 1/32 | Shutter, to lift the background |
Starting estimates. Assumes a full frame body, a 35mm or 50mm prime, and a hotshoe speedlight in manual. Every row is a seed for the sixty second test above, corrected from the histogram in the room you are in. Bounce rows assume a matte near white surface; nothing here predicts a specific ceiling.
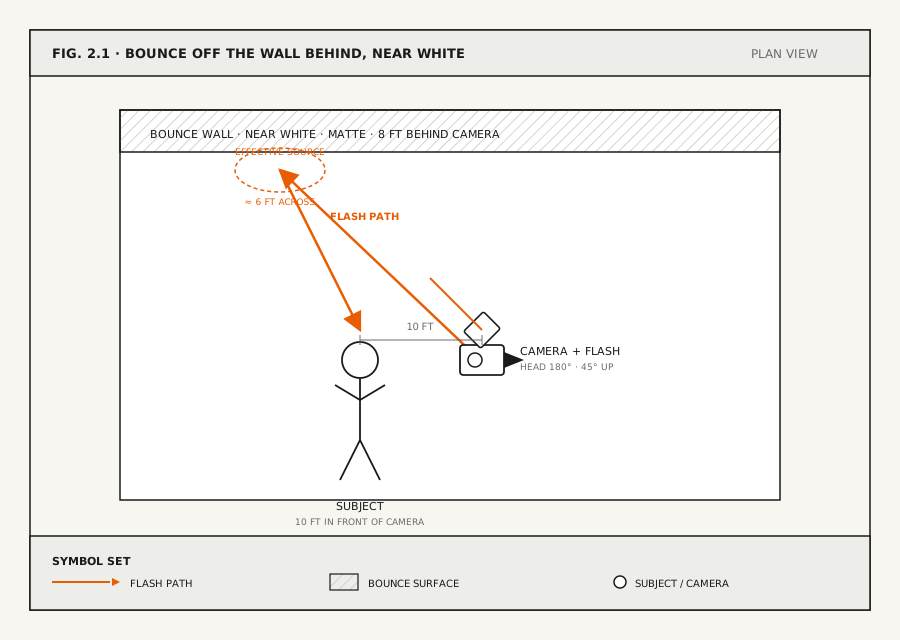
- SUBJECT: standing, 10 ft in front of camera
- CAMERA + FLASH: hotshoe speedlight, head swiveled 180°, tilted 45° up
- BOUNCE WALL: near white, 8 ft behind camera, matte finish
- LIGHT PATH: flash → wall behind → returns over photographer’s head to subject
- EFFECTIVE SOURCE: a patch of wall roughly 6 ft across at head height
- START: about 1/8 power · converge by full stops from the histogram
Above roughly twelve feet, or off any surface that is not close to white, bounce returns too little light at too strange a color to be worth forcing, and no diffusion dome rescues it: a dome inches across is still a tiny source. That is not a settings problem, it is a room problem, and the honest fixes are direct flash handled carefully or a light off the camera. We would rather send you to the next chapter than pretend a modifier solves it.
Frequently asked
Should I buy a diffusion dome or a bounce card?
Carry one small modifier if it helps you, but know what it does: it makes a tiny source slightly less tiny and spills some light forward during bounce. Published efficiency figures for these modifiers essentially do not exist, so nobody can honestly tell you what one costs in stops. The ceiling, when you have one, outperforms anything that fits in a pocket.
Why do my bounced shots come out green or tan?
The bounce surface was not white, and its color is now the color of your light. A cream ceiling warms every frame; timber turns people tan. Correct a little in post if it is mild, but the real fix is choosing a whiter surface or giving up the bounce in that room.
Is TTL or manual better for bounce flash?
TTL recalculates every frame, so two identical frames can come back at two exposures when the framing shifts. Manual holds still while the room holds still, which is what makes the sixty second test work. Use TTL when you are moving between rooms faster than you can test; switch to manual the moment you stop.
SOURCES
- Godox V1Pro product specifications, godox.com/product-b/V1Pro.html. The bounce head range quoted, 0 to 330 degrees horizontal and minus 7 to 120 degrees vertical, is from its Tech Specs table, fetched 2026-08-04.
- Jacobson, R.E., Ray, S.F., Attridge, G.G. and Axford, N.R., The Manual of Photography, 9th edition, Focal Press, 2000. The statement that bounce severely reduces subject illumination and depends on the nature and color of the reflecting surface, and the point source condition on the inverse square rule, are both stated there; paraphrased because the freely readable copy is a scanned text.